|
|
Important: You are reviewing the Ipro for desktop 3.0 Help. To view the latest release of Ipro for desktop Help, click here. |

Print and Email Documents or Document Pages on the Image Tab
Review allows you to print or email documents as they appear in the Image tab. Various options exist, including options for including annotations.

Prepare to print or email by doing the following:
-
Printing: Identify the page(s) or document(s) to be printed.
-
Emailing: Decide whether you want to send a page or an entire document, or if you will send only the case details regarding the document. Case details include case name, client name, and image key (BEGDOC).

|
Note: The following privileges affect your ability to print or email documents:
If you have any questions about your ability to print images, contact your administrator. |
Click the links below to learn more about printer setup, printing, and emailing documents or pages.
 Set Printer Options
Before you can print documents or document pages, you MUST set several printer options. Click the links before to learn how to set each of the printer options.
Define the Image Set
You can print either the original document images (appearing on the Image tab) or production images (available on the Production History tab).
After selecting the pages or documents to be printed, complete the following steps to define the image set:
-
In the Image Set area of the Print Options tab, select one of the following options:
-
Original images: Print only the contents of the Image tab (for all documents being printed). If you select this option, skip to step 3.
-
Produced images: Print one or more production images (contents of the Production History tab) and optionally the original image.
-
-
For produced images:
-
Click Select Production Precedence.
-
Select the needed production set(s). Use theandbuttons to add or remove the sets andUpandDownbuttons to organize the order in which different versions of the documents will be printed.
-
When finished, click Ok in the Select Production Precedence dialog box.
-
-
To provide a printed indicator for missing pages, select the Include Image Missing slip sheet if image not available option.
-
Continue with other print setup procedures described in this topic or click Print if the setup is complete.
Set Printer
Options
Several options exist for your print job, such as including redactions, a watermark, or search highlights. Specific privileges are needed to include or omit annotations - including redactions - when printing.
After selecting the pages or documents to be printed, complete any of the following steps in the Print Options area of the Print Options tab.
|
|
NOTE: To include redaction, etc. colors, make sure the Support Color option is selected in the Printer area of the Print Options tab. |
-
All redactions will be printed by default; To omit specific redactions from the printed pages:
-
Select the Print Redactions option.
-
Click the corresponding
 .
. -
Clear the redactions to omit and click Ok. NOTE: For redactions that are not selected, redacted text will print.
-
Select the desired redaction style (Solid, Outline, or Cross Hatch).
-
-
To include highlightsUser-applied highlights. For search-hit highlighting, see step 3., markups, embedded text, and/or sticky notes, complete the following steps. Sticky note content is printed on a separate page (identified by image key).
-
Select the Print Annotations option.
-
Click
. -
Select the types of annotations to include and click Ok.
-
-
If you are printing documents in a Search Results tab and search-hit highlighting exists in the image(s), you can include the search highlighting by selecting the Print Search Highlights option.
-
If you are printing multiple documents, select the Break Print Job at Doc Boundaries option to print each document as a separate job.
-
To include a text watermark on all pages or all documents, select Use Watermark and enter desired text. Watermark text will print lightly in the background of each page.
-
Continue with other print setup procedures described in this topic or click Print if the setup is complete.
|
|
NOTE: Use this option only with a local printer (not a batch printer). |
Without this selection, if printing to PDF, one file will be created. Or, if your printer is configured to include a slip sheet between print jobs, one slip sheet will precede all of the documents. With this option, separate files will be created or a slip sheet will precede each document.
|
|
NOTE: If you are printing to PDF, you will be required to enter a file name for each document when it is ready to print (unless your PDF printer allows automatic file naming; check with your PDF program documentation). |
Include Slip Sheets in Printing
A slip sheet is a separator page between documents. (If printing a single document, a slip sheet allows you to include a cover sheet with document-specific detail.)
If your printer is configured to include a slip sheet between print jobs, The slip sheets defined in Review will be in addition to printer-generated slip sheets.
To include slip sheets:
-
After selecting the document(s) to be printed, click the Slip Sheets tab in the Print dialog box.
-
Select the Print Slip Sheets option.
-
Select the needed paper source (selections depend on printer capabilities).
-
For blank slip sheets, select the Print Blank Page option and skip to step 9.
-
To include document details on the slip sheets, select Endorse Slip Sheet option and click
to open the Select Slip Sheet Endorsements
dialog box. -
To include a custom message, enter it in the Custom Text field.
-
To include data from one or more fields, select the needed field(s). Use the > and < buttons to add or remove fields and Up and Down buttons to organize the order of field data.
-
When finished, click Ok.
-
Continue with other print setup procedures described in this topic or click Print if the setup is complete.
Each selection in steps 6 and 7 prints on a separate line, so there are practical considerations to how much content you can include.
Include
Endorsements in Printing
Endorsements include the image key, tag details, field data, and/or a custom text message(s) printed in a document’s left, center, and/or right header and/or footer areas.

To include endorsements:
-
Plan the content and layout for endorsements. Note:
-
Each area can display up to 250 characters on one or more lines, depending on font selections, margins, image size, whether or not other areas include endorsements, and so forth.
-
Large amounts of information may span areas that do not include endorsements, or wrap within a particular area when multiple areas include endorsements.
-
Content exceeding the 250-character maximum is truncated.
-
The total amount of space available for endorsements (header plus footer) depends on the image size. Endorsements are added to the header area first; large endorsements in the header may reduce the amount of space available for footers.
-
To include large endorsements (such as multiple lines) in one or more areas, it is recommended that you print a test page to see if your endorsement selections are suitable.
-
-
To include the document’s image key in the header or footer:
-
On the Endorsement Options tab, click the Image Key tab and select the Image Key option.
-
Click Map Endorsement and
select
the location for the image key.
-
-
To include tag detail in the header or footer:
-
On the Endorsement Options tab, click the Tag Options tab and select a tag to be included.
-
Click Map Endorsement and select the location for the tag. If the selected tag has been applied to the document, the tag name will be included in the selected location.
-
Repeat this procedure to add other tag detail.
-
-
To include field content in the header or footer:
-
On the Endorsement Options tab, click the Data Fields tab and select a field(s) to be included.
-
Click Map Endorsement and select the location for the field data. If a selected field contains data, it will be included in the selected location.
-
Repeat this procedure to add other fields in other locations.
-
-
To include custom text in the header or footer:
-
On the Endorsement Options tab, click the Custom Text tab and enter needed details in the Text field.
-
Click Map Endorsement and select the location for the text.
-
Repeat this procedure to add other custom messages.
-
-
Review the layout on the Endorsement Options tab. If needed, revise the layout as follows:
-
To remove a single item, click the item in the layout area and click Remove.
-
To remove an entire area, click anywhere in the layout area and click Clear Area.
-
-
Select the endorsement Font and Font Size.
-
Continue with other print setup procedures described in this topic or click Print if the setup is complete.
|
|
NOTE: The maximum endorsement print area is one-half the output image size; if you select too much endorsement content or select too large a font size, the endorsements will be truncated. |
Print Documents or Document Pages
You can print one or more pages from a document. This procedure covers how to print documents or document pages and how to set up the print options
To print one or more documents or pages from a document:
-
On the Dashboard, click the Review module.

-
Select a Client and Case and click Open.
-
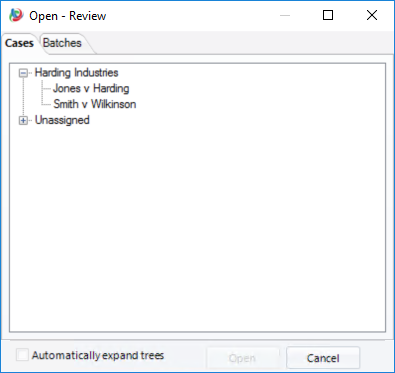
Open the needed case or batch
-
In the Case View tab or other tab in the documents pane, select the document to print.
-
Complete one of the steps in the following table to prepare for printing.
-
Identify documents to be printed by position in the active tab in the documents pane. The topmost document is 1, the second document is 2, etc., OR
-
In the Case View or other tab in the documents pane, click needed records. Use Shift+click or Ctrl+click to select a contiguous or noncontiguous set of documents, respectively.
-
In the Image tab, click
 .
. -
Select the needed option on the Print Options tab:
-
In the Printer section:
-
Select the printer to be used, plus paper size and source (selections depend on printer capabilities).
If your administrator has configured a print server, printers will include those listed under the heading “Batch Printer." Use of a batch printer frees up computer resources (because the print server will manage your print jobs). See your administrator for details on the batch printers at your site.
-
Optional: If you are printing to a color printer, select Support Color to print color (including annotation colors) instead of black and white. This option must be selected for color (even if the default setting for your printer is color).
-
Optional: Click the Advanced button to set printer-specific properties. These options will vary, depending on the printer you select.
-
-
Continue with the following procedures as needed:
Define the Image Set
You can print either the original document images (appearing on the Image tab) or production images (available on the Production History tab).
After selecting the pages or documents to be printed, complete the following steps to define the image set:
-
In the Image Set area of the Print Options tab, select one of the following options:
-
Original images: Print only the contents of the Image tab (for all documents being printed). If you select this option, skip to step 3.
-
Produced images: Print one or more production images (contents of the Production History tab) and optionally the original image.
-
-
For produced images:
-
Click Select Production Precedence.
-
Select the needed production set(s). Use theandbuttons to add or remove the sets andUpandDownbuttons to organize the order in which different versions of the documents will be printed.
-
When finished, click Ok in the Select Production Precedence dialog box.
-
-
To provide a printed indicator for missing pages, select the Include Image Missing slip sheet if image not available option.
-
Continue with other print setup procedures described in this topic or click Print if the setup is complete.
Set Printer
Options
Several options exist for your print job, such as including redactions, a watermark, or search highlights. Specific privileges are needed to include or omit annotations - including redactions - when printing.
After selecting the pages or documents to be printed, complete any of the following steps in the Print Options area of the Print Options tab.
NOTE: To include redaction, etc. colors, make sure the Support Color option is selected in the Printer area of the Print Options tab.
-
All redactions will be printed by default; To omit specific redactions from the printed pages:
-
Select the Print Redactions option.
-
Click the corresponding
. -
Clear the redactions to omit and click Ok. NOTE: For redactions that are not selected, redacted text will print.
-
Select the desired redaction style (Solid, Outline, or Cross Hatch).
-
-
To include highlightsUser-applied highlights. For search-hit highlighting, see step 3., markups, embedded text, and/or sticky notes, complete the following steps. Sticky note content is printed on a separate page (identified by image key).
-
Select the Print Annotations option.
-
Click
. -
Select the types of annotations to include and click Ok.
-
-
If you are printing documents in a Search Results tab and search-hit highlighting exists in the image(s), you can include the search highlighting by selecting the Print Search Highlights option.
-
If you are printing multiple documents, select the Break Print Job at Doc Boundaries option to print each document as a separate job.
-
To include a text watermark on all pages or all documents, select Use Watermark and enter desired text. Watermark text will print lightly in the background of each page.
-
Continue with other print setup procedures described in this topic or click Print if the setup is complete.
NOTE: Use this option only with a local printer (not a batch printer).
Without this selection, if printing to PDF, one file will be created. Or, if your printer is configured to include a slip sheet between print jobs, one slip sheet will precede all of the documents. With this option, separate files will be created or a slip sheet will precede each document.
NOTE: If you are printing to PDF, you will be required to enter a file name for each document when it is ready to print (unless your PDF printer allows automatic file naming; check with your PDF program documentation).
Include Slip Sheets in Printing
A slip sheet is a separator page between documents. (If printing a single document, a slip sheet allows you to include a cover sheet with document-specific detail.)
If your printer is configured to include a slip sheet between print jobs, The slip sheets defined in Review will be in addition to printer-generated slip sheets.
To include slip sheets:
-
After selecting the document(s) to be printed, click the Slip Sheets tab in the Print dialog box.
-
Select the Print Slip Sheets option.
-
Select the needed paper source (selections depend on printer capabilities).
-
For blank slip sheets, select the Print Blank Page option and skip to step 9.
-
To include document details on the slip sheets, select Endorse Slip Sheet option and click
to open the Select Slip Sheet Endorsements
dialog box. -
To include a custom message, enter it in the Custom Text field.
-
To include data from one or more fields, select the needed field(s). Use the > and < buttons to add or remove fields and Up and Down buttons to organize the order of field data.
-
When finished, click Ok.
-
Continue with other print setup procedures described in this topic or click Print if the setup is complete.
Each selection in steps 6 and 7 prints on a separate line, so there are practical considerations to how much content you can include.
Include
Endorsements in Printing
Endorsements include the image key, tag details, field data, and/or a custom text message(s) printed in a document’s left, center, and/or right header and/or footer areas.
To include endorsements:
-
Plan the content and layout for endorsements. Note:
-
Each area can display up to 250 characters on one or more lines, depending on font selections, margins, image size, whether or not other areas include endorsements, and so forth.
-
Large amounts of information may span areas that do not include endorsements, or wrap within a particular area when multiple areas include endorsements.
-
Content exceeding the 250-character maximum is truncated.
-
The total amount of space available for endorsements (header plus footer) depends on the image size. Endorsements are added to the header area first; large endorsements in the header may reduce the amount of space available for footers.
-
To include large endorsements (such as multiple lines) in one or more areas, it is recommended that you print a test page to see if your endorsement selections are suitable.
-
-
To include the document’s image key in the header or footer:
-
On the Endorsement Options tab, click the Image Key tab and select the Image Key option.
-
Click Map Endorsement and
select
the location for the image key.
-
-
To include tag detail in the header or footer:
-
On the Endorsement Options tab, click the Tag Options tab and select a tag to be included.
-
Click Map Endorsement and select the location for the tag. If the selected tag has been applied to the document, the tag name will be included in the selected location.
-
Repeat this procedure to add other tag detail.
-
-
To include field content in the header or footer:
-
On the Endorsement Options tab, click the Data Fields tab and select a field(s) to be included.
-
Click Map Endorsement and select the location for the field data. If a selected field contains data, it will be included in the selected location.
-
Repeat this procedure to add other fields in other locations.
-
-
To include custom text in the header or footer:
-
On the Endorsement Options tab, click the Custom Text tab and enter needed details in the Text field.
-
Click Map Endorsement and select the location for the text.
-
Repeat this procedure to add other custom messages.
-
-
Review the layout on the Endorsement Options tab. If needed, revise the layout as follows:
-
To remove a single item, click the item in the layout area and click Remove.
-
To remove an entire area, click anywhere in the layout area and click Clear Area.
-
-
Select the endorsement Font and Font Size.
NOTE: The maximum endorsement print area is one-half the output image size; if you select too much endorsement content or select too large a font size, the endorsements will be truncated.
-
-
If needed, click Calculate Page Count to find out how many pages will be printed. The total does not include banner or slip sheets.
-
When the print setup is complete, click Print.

|
To Print... |
Do This... |
|
A single page in a single document |
Select the record in the Case View or other tab in the document pane and make sure the needed page is displayed in the Image tab. |
|
A range of pages in a single document |
Select the record in the Case View or other tab in the document pane and identify the page range needed (for example, pages 1 - 4). |
|
A complete document |
In the Case View or other tab in the documents pane, select the needed record. |
|
All documents from a search or in a folder |
Perform the search or open a folder that includes the documents matching your printing needs. Make sure the tab is active in the documents pane. |
|
Multiple documents |
Take one of the following actions: |
|
Option |
Description |
|
Current Page |
Print the page currently visible in the Image tab. |
|
Current Page Range |
Select the option and enter the beginning and ending page to be printed. |
|
Entire Document |
Print all pages of the currently selected document. This is the default selection. |
|
Selected Documents |
Print the documents you have selected in the Case View or other tab. The total number of documents is shown in parentheses. |
|
All Documents |
Print all documents in the current tab in the documents pane (CaseView, Search Results, or folder). The total number of documents is shown in parentheses. |
|
Select Documents |
Select this option and enter needed documents by document number, using the format shown in the dialog box. |
|
|
NOTE: A defined print setup remains in effect for the current Review session. If different settings are needed for subsequent print jobs, check all tabs in the Print dialog box. |
Email a Document, Document Page, or Details
To email a document, a page from a document, or details about a document:
-
On the Dashboard, click the Review module.
-
Select a Client and Case and click Open.
-
Locate the document to be emailed and select it in Case View or another tab in the documents pane.
-
To send a page from a multi-page document, select it using the
page
navigation bar in the Image
tab. 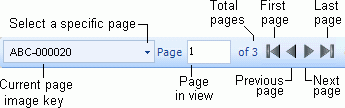
-
On the Image tab toolbar, click
 and complete the Send
Email dialog box as described in the following steps.
and complete the Send
Email dialog box as described in the following steps. -
Email Service: Choose one of the following methods for sending the email:
-
Outlook: Choose this option if you use Microsoft Outlook for your email.
-
SMTP Server: Choose this option to send email using another mail service. Enter the complete SMTP server name.
-
-
Email Options: Choose from the following options:
-
Send Document/Page Details Only: Choose this option to send basic information only. By default, this includes client name, case name, document and page (BEGDOC)
Details can be changed in the Email Body section of the dialog box (or in the email itself if using the Outlook service option). -
Send Current Page/Image: Choose this option to send the active page. Review will PDF the page image and attach it to the email message.
-
Send Entire Document: Choose this option to send the entire document. Review will PDF the document image and attach it to the email message.
-
-
Image Options: If sending a page or document, select the content to be included in the PDF file.
-
Include Redactions: If you have the privilege to see under other’s redactions, you may include or exclude them by selecting or clearing this option as needed. If you do not have the privilege, redactions will be burned into the PDF file.
-
Include Annotations: If you have the privilege to view annotations (highlights, mark-ups, embedded text), you may include or exclude them by selecting or clearing this option as needed.
-
Allow Color: Select this option to include color in the image, or clear this option to create a grayscale version of the document.
-
Endorse Image Key: Select this option to add the image key to the footer in the image file. For multipage documents, the image key is added to each page.
-
Max Size: Select the maximum size (in MB) that the file may be. When sending documents, Review will truncate the document (by page) if this size is reached.
-
-
Email Body: Complete these fields as necessary:
-
To: Enter the recipient’s email address. Separate multiple addresses with a semicolon and space, as in: jsmith@yourco.com;
-
From: If sending by Outlook, this field automatically contains your default Outlook account (can be changed in step 10 if needed). If sending by SMTP, enter the needed email address.
-
Subject: By default, the subject contains basic details about what is being sent. Change the subject if desired.
-
Body: By default, the body will include client, case, and document details. Change the body if desired.
-
-
If sending by Outlook, compose the body in the Outlook message (step 10).
-
If sending by SMTP, compose the email in a text editor and then paste it in the Body field.
-
Use common navigation keys to move throughout the text (arrow keys, etc.).
-
Line breaks are not recognized in emails sent by SMTP.
-
When selections and entries are complete, click Send. Note:
-
If sending a page or document file, it may take a few seconds for the PDF file to be created.
-
If sending by SMTP, the email will be automatically sent.
-
If sending by Outlook, go to the next step.
-
-
Outlook only: after clicking Send in Review, an Outlook message will be created. Review/revise the message if needed; when it is ready, click Send.
|
|
NOTE: To use the SMTP option, an SMTP email server must be installed and configured. If you have questions about using this option, contact your IT department. |
|
|
NOTE: If file size is a consideration, be aware that including redactions, annotations, and/or color will increase the size of the file. |
|
|
TIPS: To efficiently compose a long email: |

Related Topics
View and Print Production Documents on the Production History Tab
Version: 2019.3.0
Last Modified: December 2, 2019